GT4 Wing Riser Install Guide
Tools:

1. Remove Outer Bolt Covers


2. Remove Inner Bolt Covers


⠀⠀
3. Clean Adhesive Residue
Use heat and pry tools to remove large chunks. Rub off the remaining residue with a microfiber towel and plenty of isopropyl alcohol.
This is the most time-consuming part of the entire process, so it's smooth sailing from here!


4. Remove the Wing
Enlist a friend or reluctant significant other to keep a hand on the wing. Get a safe space ready to set the wing down.
The wing is held on by 2 bolts on each side, with a washer between the wing attachment point and the riser.
Use two drivers with Torx T30 bits to undo the bolts. Be careful not to lose the washer! This hardware will be reused, so keep it handy.
Take your selfie holding the wing and set it aside safely. Refrain from whacking it into your garage or anybody's head.


5. Remove Riser Bases


6. Clean Adhesive Residue
Use heat and pry tools to remove large chunks. Rub off the remaining residue with a microfiber towel and plenty of isopropyl alcohol.
This should be quicker and easier than the bolt cover area!


7. Remove Stock Wing Risers
Each riser is held in place by 3 bolts.
Use a driver with a Torx T30 bit to undo the bolts. These will be reused, so set them aside safely.
The risers will now lift out easily.


8. Transfer Weather Seals
Carefully remove the weather seals and transfer them to the RSNV risers.
The ridges should be facing upwards (see photo). Ensure the seal is sitting correctly above the edge.


9. Install RSNV Risers
Slide the RSNV risers into trunk lid. See photo to know which is left and right.
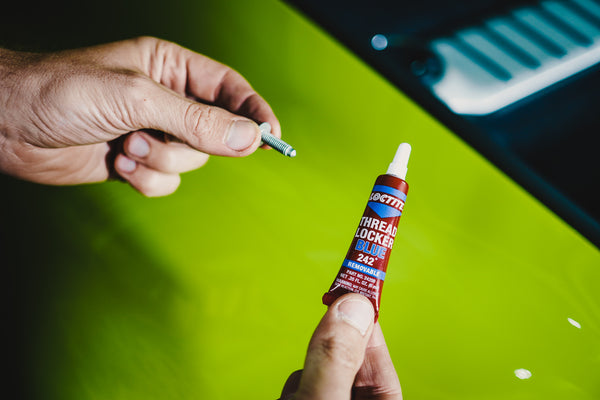
Use a little blue Loctite on the threads of all 3 bolts, just prior to installation.
Do not tighten all the way at this stage. There should be a little wiggle in the risers, which will help align the wing for installation.


10. Install RSNV Bases
Carefully slip the bases over the wing risers. See photo to know which is left and right. The RSNV logos should be on the lower outer sides.
Do not yet remove the 3M backing to reveal the adhesive. This will be done at the end.


11. Install the Wing
Align the wing with the risers. The wing attachment points go on the inner sides of the risers (see photos). Have someone carefully hold the wing in place.
The rear holes of the wing mounts allow for two settings: The upper hole is the stock wing angle. The lower hole steepens the angle of the wing for added downforce.
When using the steeper angle, we suggest removing your front aero ducts to balance the aerodynamics.
Use a little blue Loctite on the bolt threads, and reinstall the stock hardware.
The flat head bolt attaches from the outer side of the wing riser. The washer sits between the wing support and the wing mount. The rounded nut attaches from the inner side of the wing mount.
Use a torque wrench to tighten all wing and riser bolts to 8 Nm (6 ft-lbs or 72 in-lbs).


12. Apply Wing Base Adhesive
Prep the trunk lid surface by wiping with isopropyl alcohol and a microfiber towel.
Peel the backing film from the bottom of the bases.
When you are sure they are aligned, press the bases down firmly. Hold for 10 seconds each on both the long sides and the short sides to securely set the 3M Pressure Sensitive Adhesive.


You're done!
Enjoy! Tag us in your photos on Instagram: @rsnv.co
Need help? Contact us at info@rsnv.co
